CERAMICS FINAL REFLECTION
| ||
Photo of final glaze piece
|
Final thought on the best
parts of this piece.
| |
Project 1
|  | The best parts of my piece were creating a unique shape of honey- comb using slab. I also like how I manipulated the amount of glaze to give a scratched, antique look. |
Project 2
|  | I think the best part of this vase was the carving detail I added below the neck and the pinched shape of the lip of the vase. I think these additions made the vase unique. I also like the warm autumn color of the vase and the patches of olive green and fuschia that show through like strokes. |
Project 3
|  | What I found really interesting about this tripod mug was how I used the same glaze as in the vase, but different applications and amounts of the glazes dramatically changed the color. I really love the jade green and hints of blue and pink that show through with a golden yellow that highlights the sharp edges. I wanted to create a unique tripod mug, so I gave a deconstructed effect by layering rings. I think this made the mug more modern, yet the glaze gave a traditional effect. |
Project 4
|  | I really like the sentiment behind the shoe, how it pays homage to the victims of school shootings. I wanted to make a kid's shoe because it reminds me of my younger siblings and how grateful I am to be living in a safe environment. |
Looking at all of your work in class, tell me how you felt about what you accomplished.
| ||
| I am genuinely very pleasantly surprised by my journey. I didn't think I would ever be able to create the sophisticated ceramics pieces I see in shops and museums, but now I definitely have more confidence in working in with clay and slip. I will definitely continue working with clay, and hopefully, I can come to ceramics class again and create some more work! | ||
What could I do better as a teacher in making this class better?
| ||
| I really appreciate the genuine care you have towards us and your passion to help us feel more confident in our abilities. Maybe if we can have shorter demos intermittently, like showing steps one and two, and then waiting for everyone to reach that stage, then continuing again...that would help us remember exactly what steps to do and keep us all at the same pace. Thank you so much for everything, including helping us when we struggle and making ceramics so open to anyone of any skill level. Thank you for encouraging our effort and progress, not just the visual appeal of our work. | ||
I’ve enjoyed this class with each of you. I wish we had more time together. Have a great summer and
I will miss all of you.
Mr. P
| ||

Showing posts with label gr9. Show all posts
Showing posts with label gr9. Show all posts
Sunday, 3 June 2018
Ceramics Final Reflection

Sunday, 27 May 2018
Ceramics Final Exam- Shoe Reflection
Shoe Sculpture
| |
Insert Construction Photo:
 | |
Insert Reference Photo:
 | |
Describe all the skills you used to create the sculpture:
This project was an amalgamation of many skills we've used throughout this semester. We used undulation for the front of the shoe where the toes go. We did imprints using popsicle sticks cut at different widths and angles and other ceramics tools. | |
List your areas of difficulties and why:
I found it difficult creating the base shape of the shoe, especially since my shoe was a smaller one. I also found it hard to carve the clay to give the illusion of layers of fabric. | |
Pre Glaze Fire Photo
 |
Post Glaze Fire Photo
 |
Glaze Record/Technique: Teacher's Palette Cotton white glaze for the rubber parts of the shoe.
Blue Stone glaze for "jean" part of the shoe. The application was mostly left to right.
 | |
Final Reflection, what was the most rewarding aspect of the project and why?
The most rewarding aspect of the project was the concept behind this final exam. I have twin younger
siblings who have just turned five, and the school shootings have sadly targeted kids from that age group as well. This project is therefore very close to my heart. I think this shoe is a reminder of the hope we still have to build off of the hate and create a more peaceful world for children. | |
Wednesday, 16 May 2018
Ceramics Tripod Reflection
Tripod mug
| |
Insert pre fire photo here:
 | |
Construction
| |
What skills, techniques, or process did you employ to create your mug?
I used skills previously done before, like undulation (vase) and slab work. What we did thatwas different from the previous units, though, was making the three "legs" of the vase, which required new skills like filling the holes in with clay and closing the base of the vase.
How does your final construction look? Also describe the difficulties in construction.
I wanted to do something different with my construction. I think the final construction looks very unique
and cool, and I think the design gave it a more modern "deconstructed" look. It was difficult to slice the clay evenly, and it was also hard to smooth out the sides since the shape was complex. | |
Glazing
| |
Insert Pre fired Glaze photo:
 |
Insert your post fire Glaze photo:
 |
Glaze Record and technique:
Chun Plum (55) over textured turquoise. I used 2 coats of both in a left-right brush motion. I was really
really happy by how the turquoise came out more because it gave a really pretty "jade" green look with closer details of pink and blue when we look closer. | |
Final thoughts about your mug with a selfie out of your mug in the cafeteria:
Overall, I really love the color that came out, and it really taught me how to manipulate the amounts of glaze
to get variations.  | |
Thursday, 3 May 2018
Studio Art 3D Sculpture Reflection


1. My Concept
I sculpted a chess piece, a rook, for my project. Chess is very close to me as it helps me destress and improve my strategizing skills. The way I view chess is like our path of life, how we decide each move of our life that determines our outcome. I chose the rook piece for its indecisiveness; it moves back and forth. I wanted to capture that characteristic through the freestyle engraving on the rook's body. I chose certain shape elements to illustrate the shape and emotions of our decisions. I wanted the engraving to be free and "confused" to represent the rook's characteristic.
2. Successes
I really enjoyed smoothening out the edges to make the overall shape cylindrical and round and creating the thin crevices between different bumps. I think my concept was executed adequately through the engravings that I added on. This experience allowed me to think deeper beyond tangible objects, and into a more relevant concept.
3. Challenges
It was challenging for me to reduce the rectangular block into a cylindrical shape. It was also hard to keep the balance by sanding evenly and keeping symmetry (sculpting a straight rook).
4. Peer Feedback
Very balanced, very good detail and thought put into the carving to represent the indecisiveness of rook, holes are subtle, don't take away from the piece. Maybe sand the top a little better to make the surface even.
Monday, 23 April 2018
Studio Art Watercolor Reflection
 |
| Creme Brulee with Fruit |
Challenges: It was challenging controlling the water when working with watercolor, and it was hard to get deeper colors without over concentration. Something that helped this challenge was using watercolor pencil to control the color and then add a layer of water to secure it.
Peer Feedback: My peers said they liked the depth of the creme brulee and the detail of the slightly lighter color variation with the melting crystals of sugar on top. They also liked the contrast of the background's darkness and the light focus. They suggested I use masking fluid to mask out the whites so that it would be easier working around it.
Overall Journey: Watercolor, in general, was a new experience for me, and I learned a lot about the medium along the way, like how water pulls and pushes the paint, dilution versus concentration, and layering the colors for dimension. What I found intriguing was how watercolor was quite different from acrylic; it was hard to get strong colors, but it was easy to get shade variation of a color by just controlling the amount of color added. It was also useful to get a sheet of paper with various watercolor techniques to expand my use of watercolor.
Friday, 6 April 2018
Studio Art- Acrylic Painting Reflection

Cultural competence:
I went on the Exercise is Medicine trip, and the essence of that trip was looking at natural and herbal medicine and celebrating well being as well as exploring the traditional methods to keep ourselves healthy. I thought that idea was well captured through the herbal teas as it reflects traditional Chinese medicine and health.
Successes:
I think I did well on my reflective surfaces, like the cover off the tea and the handle. I also really enjoyed this part, working with different shades to make the glass area look transparent. I also think I was successful with the depth of color in the tea; even though it was time-consuming, I was happy that the tea had layers of color. I also enjoyed painting the dates because the dates had a sort of depth and texture to them.
Challenges:
Part of the characteristics of acrylic paint is that it dries very fast. Acrylic is a medium I am not experienced with at all, so it took me by surprise how quickly I had to spread my color. Also, trying to make sure my painting didn't show the brush marks I made was a challenge because I had to constantly hide the strokes at every stage.
Peer feedback:
My peers really liked how I painted the glass using color variation. They also like the depth of color in the herbal tea and on the handle, and they thought black was a good choice for the back as it drew the attention to the herbal tea. They said in the future I could work on applying the gloss varnish in one direction to make the gloss more consistent.
Saturday, 10 March 2018
Studio Art Live Drawing
This rapidiograph drawing is of my little brother when he was sleeping.

Overall, my process with all the timed drawings has been very enriching. As with a lot of the experiences I've had in in studio art, this unit was something I hadn't really done before, nor was rapidiograph something I knew of before studio art. Through these drawings, I was able to work with materials like Conte chalk, oil pastel, Prismacolor markers, and rapidiograph, and I found myself enjoying rapidiograph and oil pastel the most. Through the mannequin part of this unit, I was able to improve my sense of proportions, angles, foreshortening, positive and negative space, clear contour and sensitivity with shading. I learned the pencil technique and using my dominant eye when figuring out angles. In the live part, I not only built on those skills, but I also got to experience a bit of realism, where proportions drastically affected the artwork, and I was also able to paint creative surfaces. Throughout, I asked Mr. Laurence for feedback, and I think that was really an important step for me to improve my drawings and build off of my mistakes.

Overall, my process with all the timed drawings has been very enriching. As with a lot of the experiences I've had in in studio art, this unit was something I hadn't really done before, nor was rapidiograph something I knew of before studio art. Through these drawings, I was able to work with materials like Conte chalk, oil pastel, Prismacolor markers, and rapidiograph, and I found myself enjoying rapidiograph and oil pastel the most. Through the mannequin part of this unit, I was able to improve my sense of proportions, angles, foreshortening, positive and negative space, clear contour and sensitivity with shading. I learned the pencil technique and using my dominant eye when figuring out angles. In the live part, I not only built on those skills, but I also got to experience a bit of realism, where proportions drastically affected the artwork, and I was also able to paint creative surfaces. Throughout, I asked Mr. Laurence for feedback, and I think that was really an important step for me to improve my drawings and build off of my mistakes.
Monday, 5 March 2018


Monday, 26 February 2018
Ceramics 1 Blog Post - Box
Slab Construction
| |
Construction
| |
Reflection:
Describe what you enjoyed about the construction- I really enjoyed working with a unique shape.
In my construction, I made a shape of two hexagons together to create a honeycomb figure. I also really enjoyed making the honey spoon handle because this was beyond what we were taught in class. Describe what you found difficult or needed more instruction-
I think making the slabs fit together properly and making both halves equal in size was a struggle
because there are always little errors with measurements and working with clay. However, this was a very valuable learning process, and with Mr. P's help, I was able to understand how to fix that difficulty using a ruler for shaping. What do you think about the final outcome of your construction?- I think the final outcome of my piece very unique. I like it because it demonstrates a special part of me through the honey theme (how
my mom and I stayed up till 2 am once being very fascinated watching the process of honey on T.V).
I also like the hexagonal engravings I made on the surface to create some design and texture. I don't know how others will interpret my box, but to me, it's a personal piece that stands out from other standard boxes. | |
Glaze Record and Technique
| |
Glazes and Underglazes used:
I used the tawny color for my glaze. I used a little bit of opalescent on top (but then covered it back
with tawny).
Technique:
I just used the tawny color all over and covered the opalescent coat I had made because I didn't
want to take a risk with how different colors would interact with each other. | |
Pre Fire Glaze Photo
|
Post Fire Glaze Photo
|
 | |
Final Reflection
| |
Describe the overall final result of your piece.
The overall result of my piece looked glossy and had a nice finish with the glaze. I was glad that the engraving of the hexagons I had made was still there and that my box didn't have any cracks.
What was your biggest surprise?
My biggest surprise was how the color of glazing turned out. To my surprise, the different amounts of glazing produced a darker color in some areas that gave a really cool scratched or antique look.
What would you change for your construction technique?
For my construction, I would change the angles at which I arranged my individual slabs.
The angles I cut the slabs made it more time consuming to give a neat finish. What would you change for your glazing technique? I used opalescent but wasn't sure about the color product, so I covered tawny back on top. | |
Thursday, 8 February 2018
Studio Art Timed Marker Pens and Prismacolor Drawing Blog Post


With my pen and prismacolor+pen pieces, I really enjoyed the process. Since I didn't have any experience with the materials, it took me some time to explore and adjust to how to work with them, but I wanted to make sure I have enough practice. With both, I explored foreshortening; I did that with the fingers in the pen drawing and the charcoal colored tile in the prismacolor+pen (using the angle and perspective). I really enjoyed cross-hatching as a shading technique, because I found that I could get through the shading fast and still get a lot of depth. Using the feedback I received from Mr. Laurence, I made sure to clean up my contour lines and add an overlapping element, especially with my prismacolor+pen artwork. For that art piece, I used the pen as my contour. I found it really interesting to work on both pieces because of their interesting composition. I think through this experience I have definitely gotten some practice on using materials I'd never used before, and this has helped me improve my skills.
Tuesday, 30 January 2018
Studio Art Timed Oil Pastel/Conte Blog Post

With my timed oil-pastel drawing, I tried my best to maintain a sharp and defined contour line throughout the figure. To make the line as sharp as I could, I used a contrasting light color next to the contour which I learned from the demonstration; this helped clean the contour. With the oil pastel, the shading was a fairly quick process. I kept in mind that I'd need thicker, more prominent lines around bigger parts of the body and finer lines around small details. I asked for feedback throughout my process to find out where I can improve, like how I can show evidence of my foreshortening and how to get the white lines in between the fingers to show the slight gap between the fingers. This really helped me improve and push myself to do better. I enjoyed this process because I was observing at an angle that showed foreshortening, overlapping, and interesting negative space.
Although my piece isn't complete, I look to completing this and making it a part of my portfolio.
Wednesday, 24 January 2018
Studio Art Timed Drawing Blogpost
Although this timed drawing isn't fully completed, I wanted to make sure what has been completed hits all of the assessment criteria. I constantly asked for feedback on various stages of my drawing, and that helped me a lot on what to improve on and how to further refine my drawing. I tried to vary my line thickness, making the contour around intricate details thinner and lighter, while long, prominent lines a litter thicker and darker. Since I had never done such a practice before, I found foreshortening a little daunting at first. However, as I got to draw, I really enjoyed the foreshortening and viewing the 3-D mannequin with a 2-D lens. With the feedback I received, I tried my best to make my contour crisp and defined. All in all, this drawing was definitely a new journey for me, and I've really grown as an artist from this. Moving forward, I look to complete this and make it an addition to my art portfolio.

Wednesday, 1 November 2017
Studio Art Oil Pastel Blogpost

Concept:
My concept behind this piece was that I go to the library a lot, and in the library, I always stop and admire the beautiful artwork and pottery on display. When I look at them, I always look in an artist's point of view of how I would have made the art and how I would have recreated it, which is why there is a paintbrush held on the side. I wanted to merge my love for art with my frequent trips to the library.
Successes:
I think I was successful in my subtle color variation and layers on the vase, as well as the reflections and shadows. I also like the highlights on the metallic part of the paint brush and the frame of the table.
Challenges:
I feel it was a challenge filling up my background because I didn't want the railings to seem too crowded. Since the background was more zoomed out, it was a challenge getting the fine details.
Feedback:
Compliments:
My peers liked how I controlled the oil pastel to create lighting, reflection, and shadows, and they particularity liked the part where the light bounces off the vase. Furthermore, they liked the detail and color variation on the vase.
Criticism:
My peers suggested that I should have paid more attention to the railings in the background, especially the area on the far right. They said my inspiration for this artwork is conceptually harder to understand just by first look, but when explained is unique.
My goal for next time:
My goal for next time would be to pay more attention to my background and how to fill in space effectively.
Tuesday, 10 October 2017
Studio Art Pencil Drawing Reflection

Theme/Story: The theme behind this was food and family gathering, and I also wanted to depict Indian culture. In our family, vacation or holiday means eating food and celebrating our culture. I drew Indian sweets because usually celebrations or holidays are celebrated with something sweet.
Emphasis: Since food is a big part of our definition of "holiday" I wanted to make the food the center of attention. That's why most of the board is covered with the food on the plate. I also wanted to bring in contrast, so with the warm colors of the food and plate, I added a cold color, blue, for the tablecloth. The blue acted as a tablecloth but also as something that looks similar to flowing water, where the lamps are "floating" in.
Line: I had a lot of overlapping objects like the overlapping food and the plate on the tablecloth. For this, I used shadows where I tried to show the 3-dimensionality of the objects. I feel I could work on strengthening those shadows, but I also think overlapping was a good compositional idea.
Feedback I received: My peers said that my colors were vivid, the food looked glossy and appealing, and there was a good layering of color on the food. They suggested to make my composition more random, not so structured, to make my shadows clearer, and to make the plate more glossy with highlights.
Wednesday, 20 September 2017
Studio Art Charcoal Still Life Reflection
Reflection
This work of charcoal was very important because it showed our ability to draw reflective objects as well as understand concepts like composition (cropped object), contrast, and use of lines. I think this has appropriately pushed me as an artist to look carefully at a set-up in front of me instead of looking at a reference photo. Since our viewpoints and positions kept changing every day, this project taught me how to critically observe positioning. One very valuable piece of advice I learned from Mr. Laurence was that the white pencil for highlights need to be minimal, as it can easily get overdone and ruin the overall realism. I had worked with charcoal once before (in 8th grade), so that experience had taught me things like dirtying the paper, using highlights, and utilizing my materials appropriately. This experience was very unique though because we had to set the objects up in front of us and directly observe the still-life.
Successes:
I think I was successful at the highlights, especially the highlights of apple and glass's reflection. I tried to use the white pencil only when necessary, but the white pencil really helped bring life to the objects. I also think the composition of the overlapping objects helped because not all objects were equidistant and I also got a good variation of shadows.
Challenges/Things to work on:
I feel like my shadow of the candlestick could have been further refined. I could have also shown it through the glass. I big challenge in charocal work is smudging, and many times I'd wipe away a lot of my work and have to work back. For me though, my biggest challenge was getting started with a strong idea. I started off with something but wasn't committed to it, and spent about 2 blocks figuring out what I wanted to do. Consequently, I lagged behind and needed extra hours after school to catch up. In the end, though, this experience taught me an important lesson on time-management and the importance of starting off strong. I will use this as a reminder to keep my future projects on schedule.
Feedback:
Some feedback I recieved was that I had smooth shading and my reflection highlights weren't too harsh. They said I had strong compostion with different shadows, and my objects showed variation in shape and size. They also said I had a good contrast, with blacks against whites to define the sharp edges. But they also recommended I work on my candlestick's shadow as well as distinguish the apple from its shadow.
MY PROGRESS:
First Day

Second Day


Third Day

Fourth Day

Wednesday, 6 September 2017
Studio Art- Egg Composition Pencil Drawing

Concept:
There are two eggs or "beings" of a different race together in the same basket. Above, an eagle's feet are shown. Eagles symbolize power and justice and this eagle is acting as a messenger to delivering the two multiracial eggs justice. The tag with "To: Justice" literally takes the concept of bringing something to justice and is an address for "justice". The blanket provides as a protector during the journey of the delicate eggs in their pursuit of justice.
Successes:
I am proud of the intricate fabric I made because the fabric had many folds and places where the light fell. I also like the meaning behind my peace, as I feel this artwork is trying to convey a greater message with each element standing for some sort of symbolism.
Challenges/Things to work on:
My success was my challenge too. The fabric looked cool in the end but required a lot of time and patience. I had to look square by square and perfectly match the complicated placements for shading. I could work on my eagle's feet and perhaps the basket, and for that, I should work on spacing out my time so that each element gets equal attention.
Feedback:
I was told that my contrast with the harshness and darkness of the basket with the soft, white blanket was there. I was also told that my fabric was detailed and realistic, as well as the meaning behind this piece was deep and thoughtful. My group also liked the contrast of the white and black egg which, along with the "Justice" tag, hinted at the meaning behind my work, and they liked the movement created by the fabric and rhythm of the contrasting lines. They said I could work on the realism of the eagle's feet as well as making more outlines prominent in my fabric.
Monday, 14 August 2017
Studio Art Course Goals and Resources
Goals (Personal goal, Course goal):
My course goal would be to make sure I think outside of the box and be more creative with my art. My personal goal would be to not procrastinate so that I can complete my artwork in time.
Principal and elements of art:
Principals of art:
- Line: Line is an element of art defined by a point moving in space.
- Shape: shape implies spatial form and is usually perceived as 2-dimensional.
- Color: colors all come from the three primaries and white and black. They have three properties, hue (the color itself), value, and intensity (the pure color is of the highest intensity, but we can lower the intensity by adding its complementary color).
- Value: value refers to relative lightness and darkness and is perceived in terms of varying levels of contrast.
- Form: form has depth, length, and width and resides in space. It is 3-dimensional.
- Texture: texture refers to the tactile qualities of a surface (actual) or to the visual representation of such surface qualities (implied).
- Space: space refers to the area in which art is organized. The element of positive (the space of the shape itself) and negative space (the space around the shape).
- Perspective: Perspective is representing a volume of space or a 3-dimensional object on a flat surface.
- Perspective: Perspective is representing a volume of space or a 3-dimensional object on a flat surface.
Elements of Art:
- Balance: Balance is the impression of equilibrium in a pictorial or sculptural composition. Balance is often referred to as symmetrical, asymmetrical, or radial.
- Contrast: the juxtaposition of different elements of design (ex. rough and smooth textures, dark and light values) in order to highlight their differences and/or create visual interest, or a focal point.
- Emphasis: Emphasis refers to the created center of interest, the place in an artwork where your eye first lands.
- Movement/Rhythm: movement or rhythm refers to the suggestion of motion through the use of various elements.
- Pattern: Pattern refers to the repetition or reoccurrence of a design element, exact or varied, which establishes a visual beat.
- Unity: Unity is achieved when the components of a work of art are perceived as harmonious, giving the work a sense of completion.
- Proportion/Scale: Proportion is the size relationship of parts to a whole and to one another. Scale refers to relating size to a constant, such as a human body.
- Proportion/Scale: Proportion is the size relationship of parts to a whole and to one another. Scale refers to relating size to a constant, such as a human body.
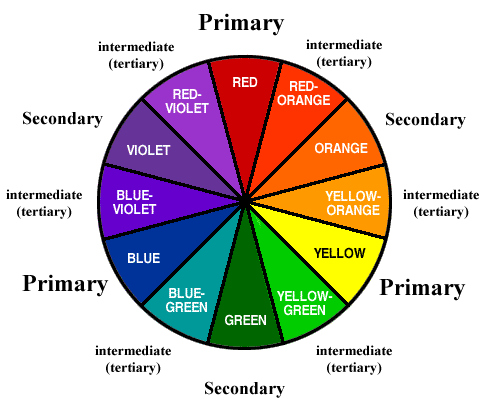
Color wheel:
The primary colors are red, yellow, and blue. They are the base for all the other colors on the color wheel.
The secondary colors are in the middle of the primary colors (are made up of primary colors). They are orange, green, and violet.
The tertiary colors are made up of a primary and secondary color. They can also be called intermediate colors. Examples are red-orange, yellow-orange, yellow-green, blue-green, blue-violet, and red-violet.
Complementary colors are colors that are opposite each other on the color wheel (ex. red and green, blue and orange, and purple and yellow.) In a formative practice in 8th grade, we had to take two complementary colors and add a bit of the opposite color to both sides (add a bit of yellow to purple on the right side and add a bit of purple to yellow on the left side) and keep doing so in a line until we reached the middle. The color gray was formed. We concluded that mixing two complementary colors results in gray.
Complementary colors are colors that are opposite each other on the color wheel (ex. red and green, blue and orange, and purple and yellow.) In a formative practice in 8th grade, we had to take two complementary colors and add a bit of the opposite color to both sides (add a bit of yellow to purple on the right side and add a bit of purple to yellow on the left side) and keep doing so in a line until we reached the middle. The color gray was formed. We concluded that mixing two complementary colors results in gray.
Your definition of art:
My definition of art is something that allows us to express ourselves in a way that can't be put into words. it reflects our personality, mood, traits, and what we hold important in our lives. Art is boundless and even though we usually associate art with painting or drawing, art can be in many other forms such as music, dance, media, drama, etc.
Subscribe to:
Posts (Atom)